
Seuls les textes en francais font foi. Only french textes are reliable.
MONTAGE
DES SUPPORTS ET DES PLEXIS
DE FEUX FLASH / NAV DE WINGLETS
WINGLET STROBE / NAV LIGHT SUPPORT
AND PLEXI COVER
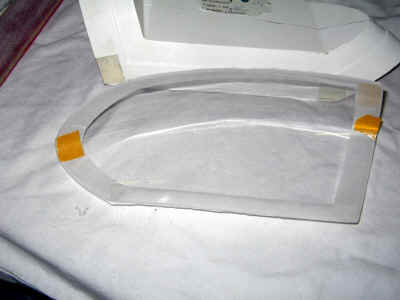
Détourage du plexi / Plexi cut out
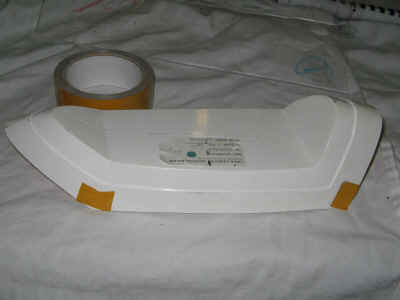
Mettre 4 petits bouts de scotch double face aux coins du support de feux
flash.
Tape 4 bits of double sised adhesive tape in each corner
of strobe support.
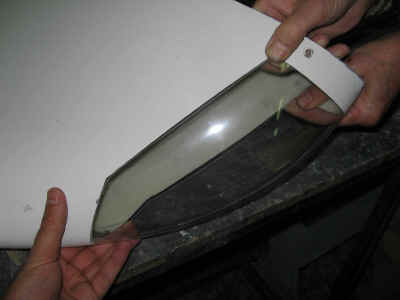
Positionner le support au mieux, à l'intérieur du plexi.
Insert the support inside the plexi, where it fits best.

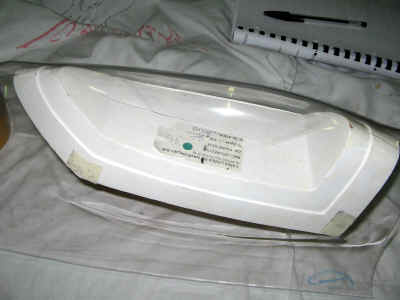
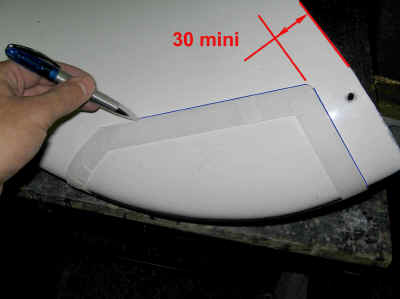
Par transparence, repérer la découpe du plexi en face de la feuillure du
support, avec du ruban adhésif de masquage ("scotch de peintre").
By transparency, mark the cutting line in front of the
plexi housing of the support, with masking tape.
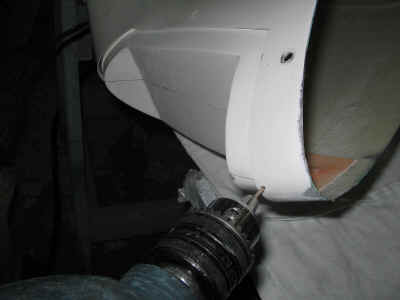
Découper le plexi au bord du scotch.
Cut the plexi along the tape edge.
Recommandations pour la découpe :
- On conseille de matérialiser la découpe avec du scotch de peintre plutôt qu'un trait au crayon : c'est plus facile à suivre.
- utiliser un outil pneumatique avec un disque diamanté pas trop usagé (qui tourne rond), et non encrassé par de la résine ou du plexi fondu.
- Faire des découpes de 20 à 30 cm de long maxi, sinon problèmes de vibrations du morceau découpé, qui risque en se cassant de provoquer une fissure dans la partie à conserver.
- Faire la découpe en plusieurs passes et non pas d'un seul coup (si le disque se bloque on casse le plexi)
- Faire une première passe en appuyant peu, profondeur environ 1 mm.
- Dernière passe : on découpe complètement. Attention aux vibrations du morceau "en l'air".
About the cutting : some tips :
- We advise to use some masking tape to locate the contouring line rather than a pencil line, it is easier to follow.
- use a pneumatic tool with a good diamond cutting disk, which is not clogged up with resin or melt plexiglass.
- make some 20 to 30 mm long cuttings maximum, because when too long, the cut part starts to vibrate, and can cause a crack in the canopy when detaching.
- Make the cutting in several passes rather than in one single time (if the disk jams, you brake the plexi) :
- make a first cut with light presure on the tool (1 mm deep)
- last cut : cut out completely. Be careful with the vibrations of the detached part.
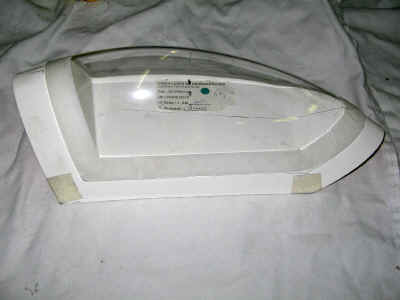
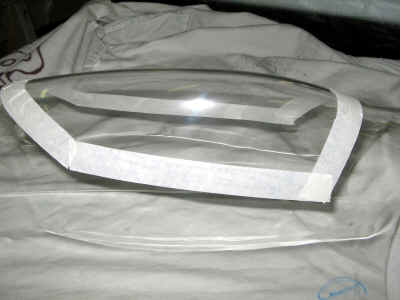
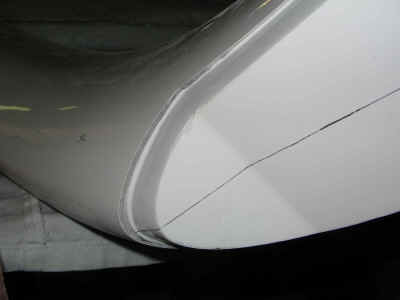
Ajustez la découpe à la meuleuse puis à la cale à poncer pour obtenir un bon
emboitement du plexi sur le support. Poncez dans le sens de la longueur pour ne
pas créer d'amorce de crique dans le plexi.
Finalise the cut out with a grinder and then with an
abrading block , to get a good fit of the plexi on the support. Abrade
lenghtwise to avoid initial points of cracks in the plexi.
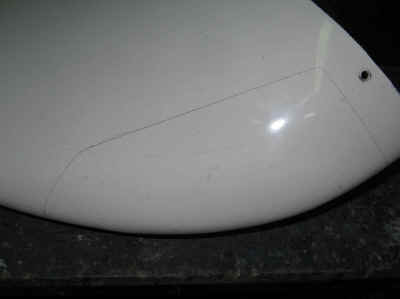
Découpe du winglet / Winglet cut out
Mettez 2 petits bouts de scotch double face à l'intérieur du plexi au bord
d'attaque.
Put 2 bits of double sided adhesive tape inside the plexi
at the leading edge.
Positionnez le plexi sur le winglet, selon la découpe du winglet le bord
interne du plexi doit se trouver à 30 à 40 mm du bout du winglet.
Tracez la découpe sur le winglet autour du plexi.
Put the plexi on the winglet, depending how long the plexi was cut, the
inner edge of the plexi may be 30 to 40 mm from the winglet root. Mark
the winglet around the plexi with a pencil.
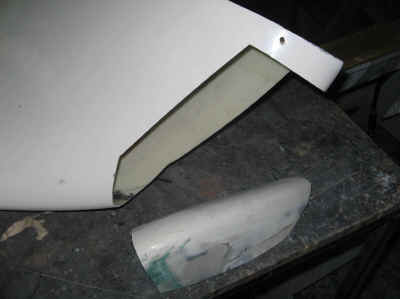
Decoupez selon le tracé précédent.
Cut the winglet along previous line.
Mettez le plexi en place pour vérifier et améliorer la découpe.
Install the plexi to control and finalise the winglet cut
out.
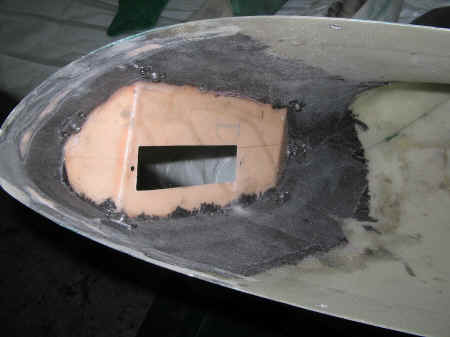
Collage du support /Support glueing
Positionnez le support à l'intérieur du winglet.
Install the support inside the winglet.
Au besoin, meulez les surépaisseurs de stratification à l'intérieur du
winglet pour que le support s'applique le mieux possible.
If required , abrade the thick overlays inside the winglet
to make the support fit better.
Refaites un essai de positionnement du plexi, améliorez la découpe du
winglet ou du plexi au besoin.
Faites tenir l'ensemble avec des petis morceaux de scotch double face, des
pinces, etc...
Check again with the plexi, improve the winglet cut out again
if required.
Hold parts together with adhesive tape, pliers...
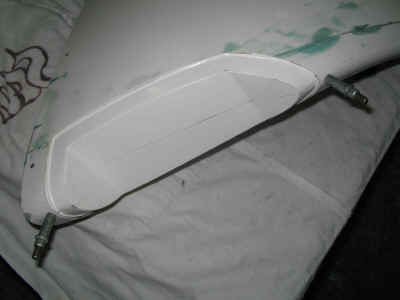
Contre percer et bitarder le support sur le plexi.
Drill and fix the support to the winglet with cleco
fasteners.
================
PAS ENCORE DE PHOTO DISPONIBLE DE LA SUITE DES OPERATIONS.
Si vous faites ce travail chez vous, merci de prendre quelques photos et de
nous les envoyer. (contact@dyn.aero)
NO PICTURE OF THE FOLLOWING STEPS AVAILABLE YET.
If you proceed at home, thank you to take a few pictures and to send them
to us (contact@dyn.aero)
================
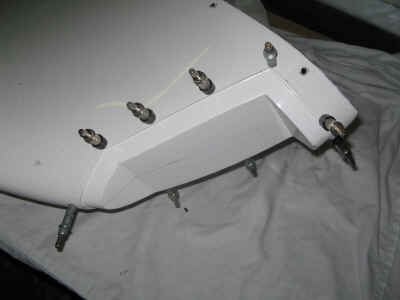
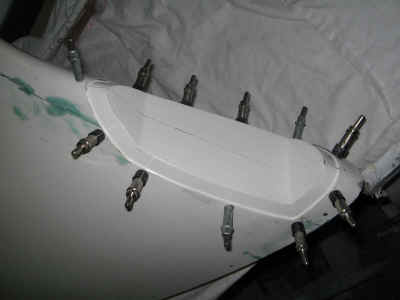
Préparez des languettes de bois (ex : "touillettes" pour la colle)
ou d'aluminium , à mettre entre les bitards et les pièces, pour éviter que la
peau du winglet gondole entre chaque bitard au moment du collage.
Prepare wood stickers or aluminium stripes to put under
the clecos, to avoid buckling of the winglet skin between each cleco during
bonding.
Démontez les bitards.
Remove the Clecos
poncez le plus possible le gelcoat sur la partie à encoller du support, sans
endommager les fibres,
poncez l'intérieur de la peau du winglet.
Remove as much gelcoat as you can on the bonding area of
the support, withoud damaging fibres,
Abrade inside the winglet skin.
Nettoyez et dégraissez
Clean and degrease.
Collez à la colle éopxy A-175/400.
Glue with epoxy A-175/400
Maintenez en place avec les bitards et les languettes de bois. Si vous voyez
que la peau du winglet gondole, repercez un trou et mettez un bitard. Essuyez
bien les coulures de colle à l'intérieur et à l'extérieur.
Hold with cleco fasteners and wood stickers. If you see
the winglet skin buckles, drill another hole and put one more cleco. Carefully
wipe glue drops outside and inside.
Après séchage de la colle , retirez les bitards.
One glue is cured, remove clecos.
Renforcez le collage avec une couche de tissu de carbone 200 g/m² à +/- 45°
: stratifiez une bande de 40 à 50 mm de large, à cheval entre le support et la
peau du winglet. Recouvrez d'un tissu de délaminage (à retirer après séchage).
Conseil : juste avant de faire la strate, bouchez les trous de bitards
avec un adhésif à l'extérieur, et remplissez les trous avec de la résine.
Reinforce the winglet structure around the support with
200g/m² @+/- 45 °carbon fibre, layup one stripe 40 to 50 mm wide, half covering
the support edge and half on the winglet skin. Add a peel ply (to be removed
after curing).
Avice : just before lay-up, cover the cleco holes with adhesive tape from
outside, and fill the hole with resin.
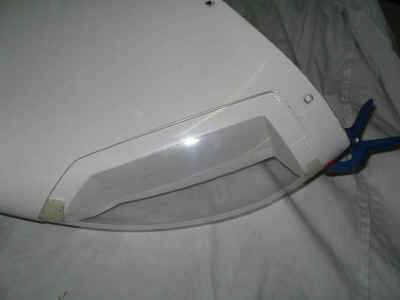
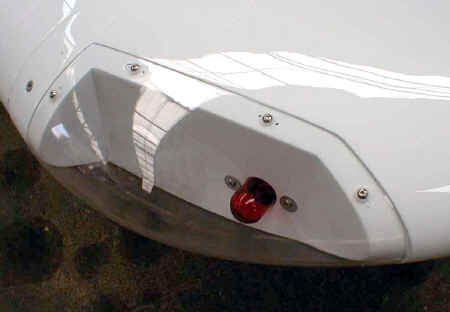
Fixation du plexi / Plexi fixation
Positionnez le plexi sur le support.
Au besoin, ajustez un peu le détrourage pour qu'il s'emboite au mieux sur le
support.
Put the plexi onto the support
If required, cut the plexi a little more to make it fit perfectly onto the
support.
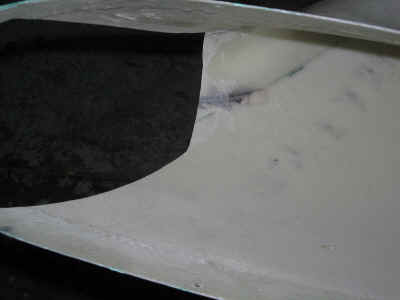
Si le plexi ne plaque pas bien sur le support (ex : feuillure trop profonde
par endroits ) :
Protégez le bord du plexi, à l'intérieur et à l'extérieur, avec une bande de
scotch d'emballage sur une largeur de 30 mm minimum.
Le scotch doit être le plus lisse possible pour un meilleur résultat.
Chargez la feuillure avec une couche un peu trop épaisse de mastic de
carosserie.
Positionnez et pressez sur le plexi pour faire un "moulage" de la
feuillure. Le maintenir jusqu'au séchage du mastic.
ATTENTION : toute trace de mastic sur le plexi doit être enlevée avec du
dégraissant plastique ou de l'acétone AVANT séchage.
Ensuite, retirez le plexi et poncez le mastic qui a débordé.
If the plexi doesn't fit so well onto the support
(housing too deep in some places) :
Protect the plexi , inside and outside, on the egde a 30 mm wide with
packaging adhesive tape .
The tape must be as even as possible to get a nicer result.
Fill the housing with car paint filler (put a little too much).
Position the plexi and hold it pressed on the filler, to take a
"moulding" of it. Don't move untill it's hardened !
ATTENTION : any trace of filler on naked plexi must be removed BEFORE it
hardens with plastic degreaser or acetone.
Then, remove the plexi, and abrade filler that flood out.
Attention danger : Percage du plexi / Plexi drilling
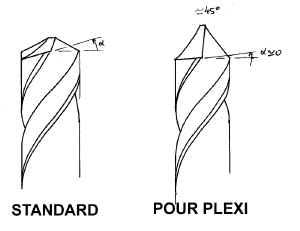
Pour éviter d'éclater le plexi, affutez un foret de 3.5 ou 4 mm, TRES POINTU
et avec un ANGLE DE COUPE TRES FAIBLE ou nul.
Ou préférez un foret usé à un foret tout neuf qu risque de se
"planter" dans le plexi.
Au moment de percer , mettez un tasseau de bois sous le plexi. tournez vite
mais n'appuyez pas.
To avoid breaking the plexi, sharpen a 3.5 or 4 mm drill,
fine tapered and with a very low or zero cutting angle.
Or take an old, weared drill ; rather than a new one that may
"catch" into the plexi and explode it.
When drilling, put a wood block under the plexi. Turn fast but don't press
much.
Percez uniquement le plexi aux endroits indiqués (extrados et intrados), à
3.5 ou 4 mm (le diametre du trou doit être au moins 0.5 mm au dessus du
diametre de la vis). NE PAS contrepercer le support.
Drill only the plexi, as shown above (intrados and extrados), D. 3.5 or 4
(the hole in the plexi must be at least 0.5 mm bigger than the screw). DO
NOT counterdrill the support.
Positionner le plexi, et tracer l'emplacement des trous.
Set the plexi in place and mark the holes in the support.
Percer le support diametre 3.
Drill the support D 3mm.
Installer les écrous prisonniers avec des rivets Tête Fraisée.
Fix the captive nuts with countersunk head rivets.
Fixez le plexi avec des vis BHC de 3 mm, et des rondelles en plastique.
ATTENTION , ne SERREZ PAS trop les vis.
Fix the plexi with BHC 3mm screws, and plastic washers.
ATTENTION, do NOT TIGHTEN too much on the plexi.
Peinture / Painting :
En service, l'eau s'infiltre entre le plexi et le support et stagne au
niveau de la feuillure avec de la poussière et des salissures. Nous conseillons
de peindre le tour du plexi à cet endroit.
In operation, water can penetrate and stay between the
plexi and the support, and accumulate dust and dirty. We advise to paint the
edge of the pexi above the housing.
Evitez de coller le plexi, par exemple avec un joint mastic, car si il est
nécessaire de le démonter, il peut être impossible de le décoller sans le
casser. Note : On accède facilement aux ampoules par l'arrière en démontant le
winglet.
Avoid glueing the plexi, ex: with mastic glue, since if it
is necessary to remove it, it may be impossible to unglue it without breaking
it. Note : acces to the bulbs is from the rear side, by removing the winglet.