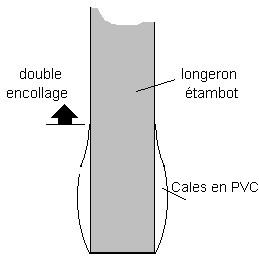
GAMME DE LONGERON D'ETAMBOT
STERNPOST SPAR MOUNTING INSTRUCTIONS
[mise ŗ jour / updated 12/02/2002]
COLLAGE
/ BONDING : -Assurez-vous de pouvoir remonter le longeron et l'empennage ŗ la mÍme place. - Collez les nervures PVC (colle ťpoxy). Maintenez-les
sur les tiges avec des TOUT PETITS bouts de scotch (pour pouvoir les arracher quand on
retirera les tiges)
- Collez les nervures PVC (colle ťpoxy). Maintenez-les
sur les tiges avec des TOUT PETITS bouts de scotch (pour pouvoir les arracher quand on
retirera les tiges)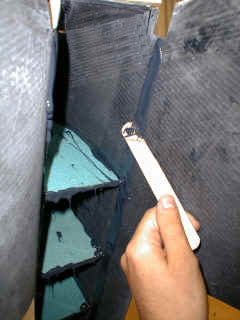
- Encoller l’arriŤre des nervures PVC avec de la colle ťpoxy.
- Apply epoxy glue to aft face of PVC ribs.
- Encoller le longeron (NE PAS OUBLIER LE DESSUS DE LA CORNI»RE ! )
- Spread epoxy glue on the spar (DON'T FORGET THE TOP OF THE L BAR ! )
- Encoller aussi l'intťrieur de la dťrive (double encollage).
- Also put glue in the fin (double bonding).
- Mettre en place le longeron et maintenir avec les bitards pour le
collage
- Put the spar on its place and hold with the CLecos during the bonding.
- Encollez les cales en PVC ŗ l'ťpoxy et glissez-les en place en contrŰlant que vous
ne dťformez pas la dťrive.
- Put glue on the PVC spacers and place them, checking you do not distort the fin.
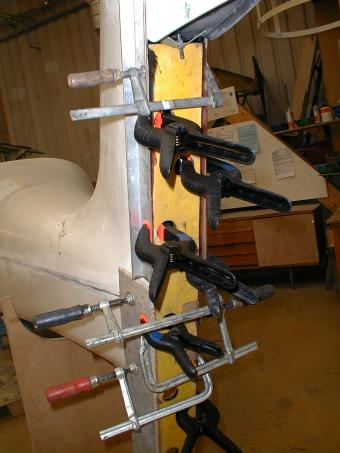
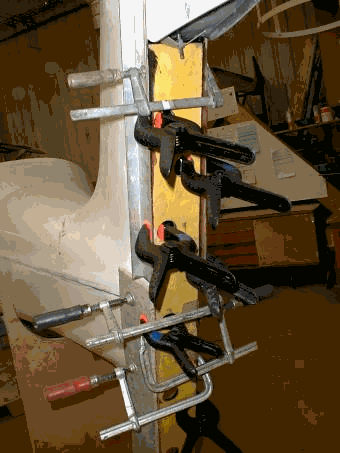
-Alignez les bords de fuite en insťrant la cale de 95 mm au raz du bord, et en posant
des tasseaux rectilignes ŗ l'extťrieur. Maintenir avec des serre-joints ou des pinces
(serrage modťrť ! )
- Install the 95 mm wide block , put some straight spacers outside, and hold them with
clamps. (moderate tightenig !)
REMETTEZ LA PROFONDEUR et renouvelez les opťrations de dťgauchissage
pour assurer le positionnement pendant le collage.
INSTALL TAILPLANE BACK IN PLACE and restart all the operations to
level the tailplane, to make sure it is straight during the bonding.
Parfois, quand la gouverne de direction est en place, le bord de fuite de la dťrive
n'est pas bien rectiligne et alignť avec la gouverne, dans ce cas il est nťcessaire de
rťaligner et renforcer cette partie. Prenez une cale en bois de 95 mm de large, et deux
tasseaux, de la longeur de la gouverne.
Sometimes after fitting the rudder the rear section of the fin is not nice and straight it
will be necessary to reinforce this area with carbon fibre to straighten it. Take a piece
of wood 95mm wide and two battens the length of the fin.
Dans votre kit, prenez deux morceaux de carbone CBX 440. Avec les techniques
habituelles, stratifier l'intťrieur de la peau de la dťrive entre le longeron d'ťtambot
et le bord de fuite. Utilisez de la rťsine SR1700, et recouvrez d'un tissu de
dťlaminage.
Protťgez les tasseaux et la cale de largeur 95 avec du scotch d'emballage.
Insťrez la cale entre les deux bord de fuites et appuyez avec les 2 tasseaux pour
maintenir le bord de fuite rectiligne et au bon ťcartement.
Locate in your kit two lengths of heavy carbon fibre and peel ply. Using the usual
techniques the carbon fibre is applied to the inside of the fin aft of the stern post in
such a way as to reinforce the vertical trailing edge of the fin. use Resin / Carbon fibre
and peel ply. Use smooth packing tape on the 95mm wide piece of wood and the battens to
prevent them sticking to the fuselage.
Insert the 95mm wide piece of wood between the fin trailing edges and press with the two
battens to hold the edges straigth and with the correct spacing.
AprŤs le sťchage de la rťsine, dťmontez les pinces, les tasseaux etc... Ne
dťmontez surtout pas avant sťchage !
Once the resin has cured remove the clamps, battens etc.. Do not do this until the resin
has well cured!!!