
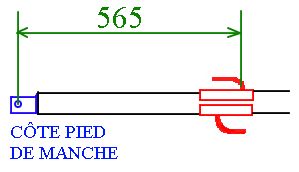
COMMANDE TRIM
TRIM CONTROL SYSTEM
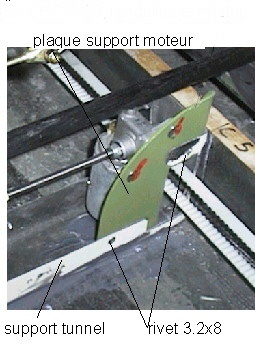
- Coller et riveter la plaque moteur sur le support tunnel. (rivet TF 3.2x8)
- Glue and rivet the engine
- Fixer la plaque au couple 5 avec une vis FHC 4x35.
- Secure the engine support plate to Nį5 frame with a 30 mm long 4 mm diameter
Hex head screw.
- Monter le chariot sur la vis moteur, avec 2 rondelles en plastique de chaque cotť.
- Install the carriage on the engine's screw, with 2 plastic spacers on each side.
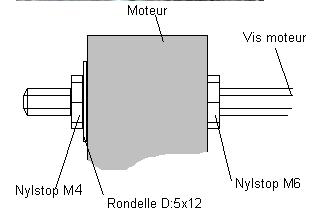
- Monter la vis sur le moteur.
- Install the screw onto the engine.
- Monter le moteur sur la plaque support. (vis poÍlier M5x10)
- Install the engine on the support plate (10 mm long 5 mm diameter slotted head
screws).
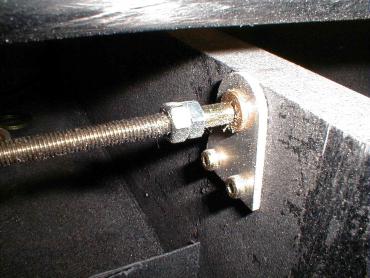
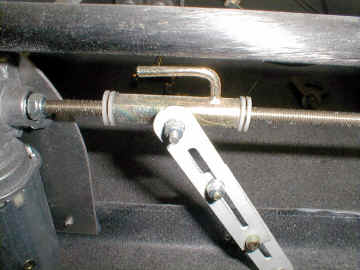
- Contre percer le couple 6 avec le palier d'extrťmitť.
- Backdrill the frame nį6 with the leading screw support.
- Coller et visser le palier d'extrťmitť sur le couple 6. (vis CHC 4x35, rondelles et
Nylstop M4)
- Glue and screw the leading screw support to Nį6 frame (35 mm long 4 mm
diameter Hex head screws, washers and M4 Nylstop nuts).
- Intercaler l'entretoise et rťgler les contre ťcrous.
- Insert the spacer and set the set-nuts.
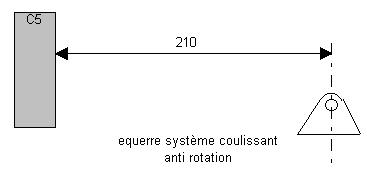
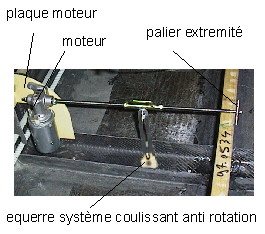
- Coller l'ťquerre systŤme coulissant anti rotation au milieu du support tunnel.
- Glue the anti-rotation sliding system bracket in the middle of the tunnel support.
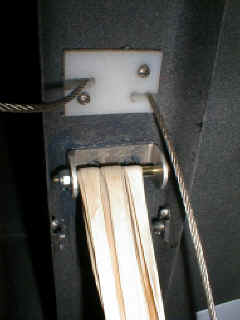
- Monter le systŤme coulissant. (vis CHC4x10)
- Assemble the anti rotation sliding system (10 mm long 4 mm diameter Hex head
screws).

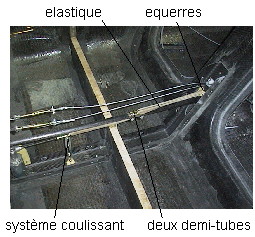
- Coller et riveter les ťquerres. (rivet TP 3.2x8)
- Glue and rivet the L. bars (8 mm long 3.2 mm diameter flat heat rivets).
- Winkel kleben und nieten ( Nieten 3,2x8 )
- Fixer les deux demi-tubes sur la bielle carbone : coller plus collier Serflex D12-22
(serrage TRES MODERE ! ! !).
- Secure both half-tubes to the carbon fiber rod : glue and install a 12-22 mm
diameter hose clamp.
- 2 Halbrohre auf HŲhenruderbetštigungsstange kleben + Serflexbriden 12 - 22
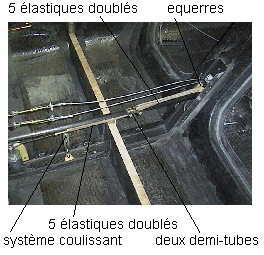
- Monter les cinq ťlastiques doublťs de chaque cotť. (ťlastique: 10x150)
- Install 5 rubber bands, ( 10mm wide x 150 mm long ) DOUBLED onto both the front and back
of the control rod. (10 rubber bands in total).
- Graisser le chariot mobile
- Put grease on the carriage.
- Brancher une batterie.
- Connect a battery.
- Batterie anschliessen.
- Faire des rťglages si nťcessaire pour avoir un fonctionnement libre sans jeu.
- Adjust if necessary to get a smooth working of the system without mechanical
clearance.
- Probelauf ausfŁhren. Wenn nŲtig Einstellungen vor nehmen um eine spielfreie und
leichtgšngige Funktion zu gewšhrleisten.