
AJUSTAGE DU CAPOT MOTEUR SUPERIEUR
UPPER ENGINE COWLING TRIMMING
Préliminaires / foresteps :
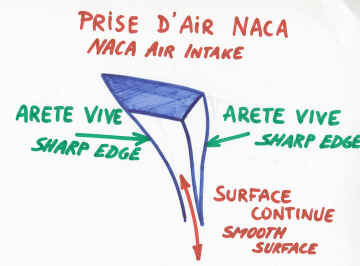
Ouvrir la prise d'entrée d'air et les deux NACA de refroidissement
carbus. Pour le bon fonctionnement des NACA, poncer le bord d'attaque pour que les
filets d'air ne décrochent pas.
Open the engine ram air intake and both carburator refreshing NACA air intakes. For a
good NACA intakes operating, abrade the leading edge to avoid airstream separation.
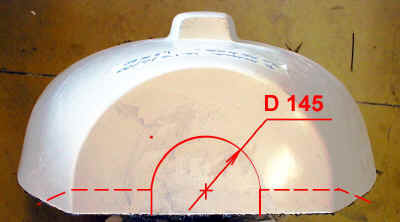
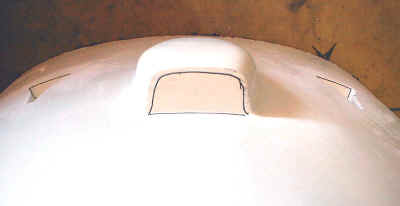
- Repérer le centre de la partie avant du capot supérieur, en vous
référant au diametre extérieur.
- Tracer la découpe du passage de moyeu d'hélice dia. 145 mm.
- Locate the upper cowling front part center , referring to the outer
diameter.
- Draw the engine flange way through cutting line, dia. 145 mm.
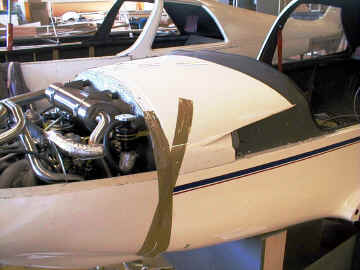
- Poser le capot supérieur en place sur le capot inférieur
- Repérer la découpe du pan de joint (les deux parties du capot doivent etre bord ŕ
bord, et le diametre extérieur doit s'aligner sur la couronne d'hélice).
- Découper l'avant.
- Sur les côtés, faire une découpe en biseau (env 30°) de quelques centimetres , pour
"aider" le capot supérieur ŕ s'adapter sur le capot inférieur.
- Put the upper cowling onto the lower one
- Locate where to cut in order to make both cowling edges touch and outer diameter fit
with the propeller flange.
- Cut the front face.
- Cut the sides over a few centimeters, with an angle of about 30°, to help the upper
cowling to fit onto the lower one.
Repérage, découpe et ajustage :
Locating, cutting and trimming :
Monter le pontet, serrer les vis de fixation latérales.
Install the bridge, tighten the screws on the sides.
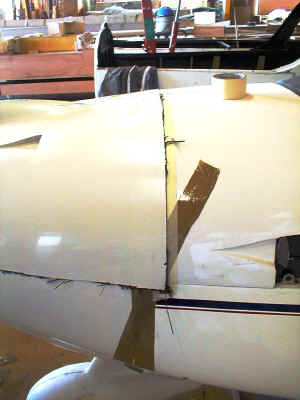
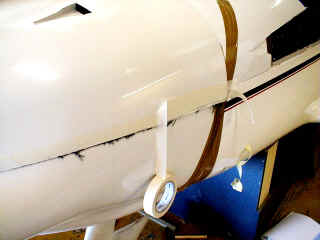
- Coller un scotch de 50 mm le long du soyage ŕ l'avant du pontet.
- Poser le capot.
- Put a 50 mm wide adhesive tape along the step on the front of the
bridge.
- Install the upper cowling.
- Coller une bande de scotch de la męme largeur au dessus de la
précédente
- Coller une troisičme bande de scotch bord ŕ bord
Et ainsi de suite, comme pour le capot inférieur.
- Put a second adhesive tape (of the same width) over the previous one
- Put the third tape along.
And so on (see lower cowling).
Meme méthode de repérage sur les côtés
Use the same method for the sides.
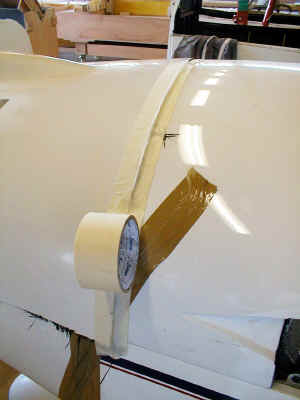
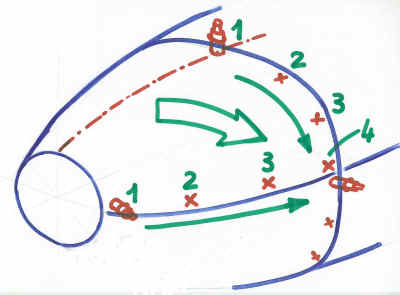
Quand on approche du résultat final, pour que le capot
soit bien tendu ŕ la fois sur le pontet et sur les côtés , suivre le diagramme
suivant :
- Percer et fixer avec un bitard (repčres 1)
- bien plaquer (flčches)
- "fignoler" l'ajustage le long du pontet et du capot
inférieur juqu'aux niveaux n°2
- percer et fixer avec les bitards n°2
- etc ...
When you are close to get a good result, in order to
avoid ugly buckles you need to tighten the upper cowling on the bridge and on both sides,
following the method below :
- Drill and hold with a cleco fastener (marking 1)
- Tighten (see arrows)
- finish the trimming along the bridge and the lower cowling, up to the
markings n°2.
- Drill and hold with clecos n°2
- etc...
Quand tous les bitards sont placés, on peut contre-percer les trous dia.
4 mm.
Once you have placed all the clecos, then you can backdrill the holes dia. 4 mm.
Finition : mise en place des écrous prisonniers.
To finish : put the floating anchors on.
Installez les écrous prisonniers dia. 4 mm avec des rivets dia. 2.4 mm ŕ
tęte fraisée, ŕ l'intérieur du fuselage et dans le capot inférieur.
Fix the dia. 4 mm floating anchors with 2.4 mm dia. countersunk head rivets, inside
the fuselage and in the lower cowling.
Trappe ŕ huile / Oil gauge door :
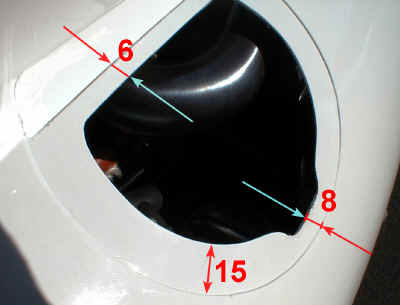
Découper la trappe ŕ 15 mm du rebord , et ŕ 6 mm de l'emplacement de la charničre.
Au niveau du loquet, faire une échancrure pour que le fermoir passe sans forcer (laisser
8 mm entre le rebord et la découpe).
Cut the door 15 mm from the step, and 6 mm from the hinge location. Face to the latch,
cut at only 8 mm to avoid any excess stress when you lock it.
Préparer la charničre : faire 3 trous dia. 3.2 mm de chaque côté.
Prepare the hinge : drill three 3.2 mm diameter holes on each side.
- Positionner la charničre dans son emplacement (centrée, et pas trop prčs du rebord
pour faciliter l'ouverture). Maintenir au scotch double face. Contre-percer les trous mais
ne pas riveter maintenant.
- Repérer la position de la trappe par rapport ŕ la charničre. (double face)
- Contre-percer la trappe avec la charničre.
- Fraiser les trous (côté trappe) et fixer la trappe sur la charničre avec des rivets
pleins.
- Place the hinge in its location (center it, and don't put it too close to the
egde to let it open wide). Hold with double side adhesive tape. Backdrill the holes but
dont put the rivets for the moment.
- Locate the position of the door on the hinge (double side tape).
- Backdrill the door trough the hinge
- Countersink the holes (on the door side) and fix the door on the hinge with solid
rivets.
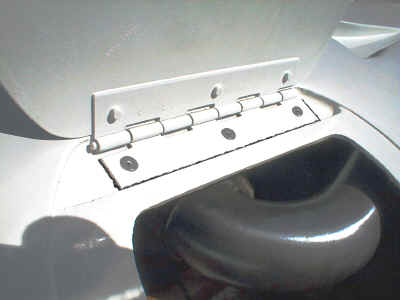
- Fraiser la charničre
- Coller la charničre sur le capot ŕ la colle MSP15 (colle ŕ verričre) et riveter ( 3
rivets dia. 3.2 mm Tęte Fraisée).
- Countersink the hinge
- Glue the hinge on the cowling with MSP15 (canopy glue) and rivet it (three countersunk
head 3.2 mm diameter rivets)
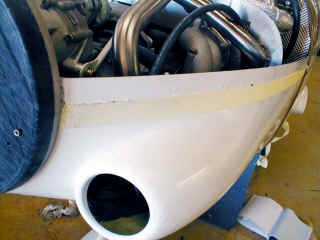
Protection thermique / thermal protection
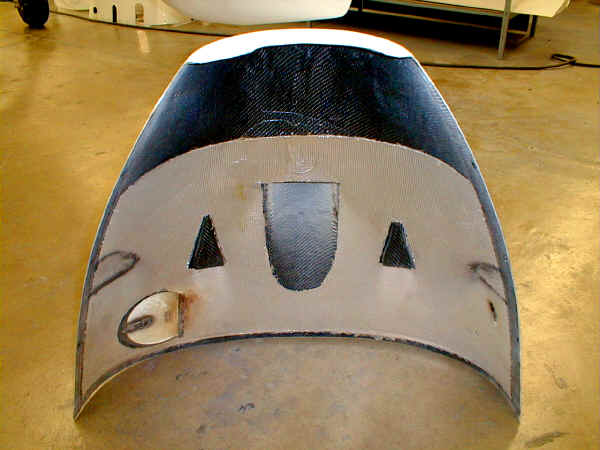
- Le capot supérieur doit etre protégé de la chaleur dégagée par le 4-en-1
Collez le tissu de protection thermique (fibre de verre aluminisée) sur a face interne du
capot, ŕ la colle néoprene, comme sur la photo ci dessus.
- The top cowling must be protected from the high temperatures emitted by the
4-in-1 exhaust pipes.
Glue the thermal protecion (aluminium coated fibreglass) on the inner side of the cowling,
with neoprene glue, accordingly to the picture above.