
PREPARATION ARCEAU VERRIERE ET PONTET
CANOPY FRAME AND FUSELAGE COVER PREPARATION
Edition 08/00
Prťparation arceau de verriŤre:
Canopy frame preparation :
Prťparation des charniŤres :
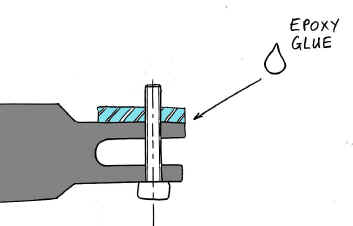
Dťpolir et dťgraisser la charniŤre et la plaquette en alu taraudťe.
Coller ŗ l'ťpoxy et mettre en pression avec une vis M4 cirťe. (1 piŤce droite , et un
piŤce gauche).
Sand and degrease the carbon hinge and the threaded piece of aluminium
Glue with epoxy and hold pressed with a M4 screw, waxed (1 right, 1 left part)
Fixer les ťquerres d'articulation / fix the articulation brackets:

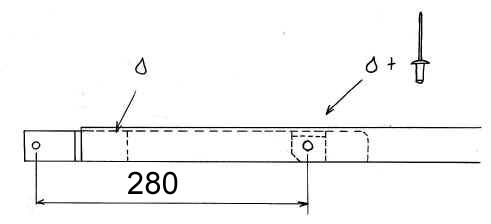
Scotcher les cales de 5 mm au scotch double face, sur le rebord et le fond de
l'emplacement de l'arceau de verriŤre.
Tape some 5 mm thick spacers with double side tape, on the side and on the back of the
canopy frame place.
Installer l'arceau sur le fuselage. Assurez vous qu'il soit bien en place contre les
cales.
Put the frame on the fuselage. Make sure it fits well everywhere against the spacers.
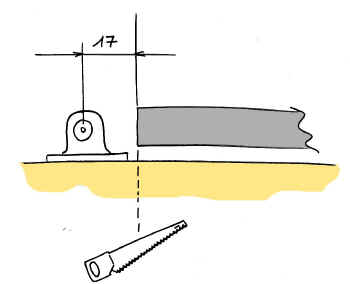
Recouper l'arceau carbone 17 mm en arriŤre de l'axe d'articulation
Cut the carbon frame 17 mm behind the rotation axis
Installer les charniŤres de verriŤre en carbone sur les ťquerres d'articulation
Install the carbon hinges on the articulation brackets.
Emboiter l'arceau sur les charniŤres carbone, maintenir avec du scotch
Slide the frame onto the carbon hinges, hold temporary with tape.
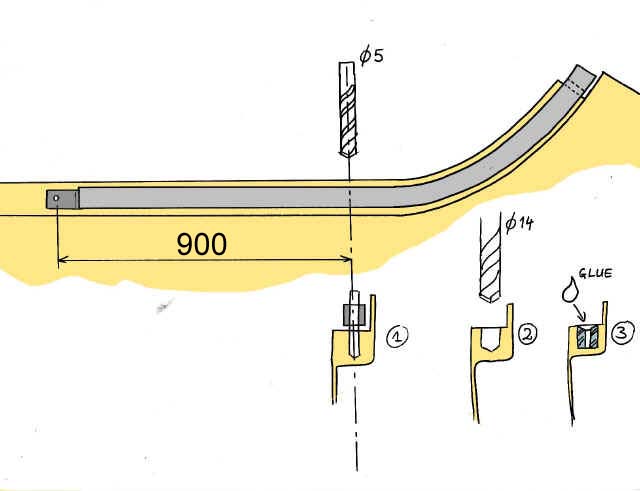
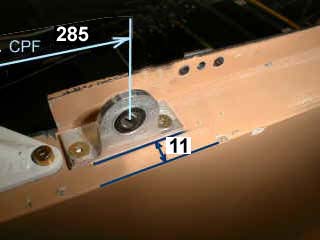
Percer les trous de fixation des pions de centrage (diamŤtre 5) : axe vertical ŗ 900
mm de l'axe d'articulation.
Drill the holes fot the locating pins (5 mm diameter) : vertical axis, set at 900 mm
from the hinge.

Collez les douilles de centrage ŗ la colle ťpoxy dans le fuselage : la partie en
entonnoir vers le haut, qui affleure au fuselage.
Glue the locating pin sockets with epoxy glue in the fuselage : the conic part
upwards, flush with the fuselage.
Installez les pions de centrage
Install the locating pins
Vťrifiez l'ajustage
Check everything fits well
Contre percez l'arceau et les charniŤres carbone et mettez un bitard
Drill the frame and the carbon hinges together, and put a Cleco fastener
Dťmontez l'arceau
Remove the frame
point de fixation du vťrin
gas lifter fixation point :
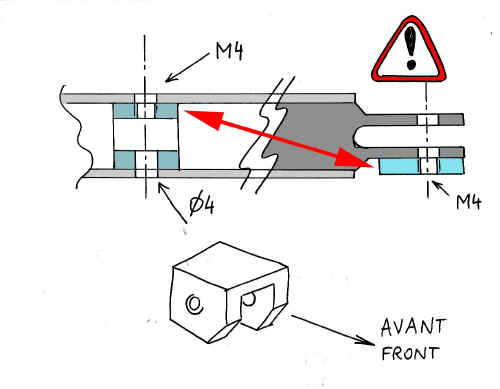
Repťrez la position des pieces d'articulation du vťrin , percez l'arceau
D4.
Collez ŗ l'ťpoxy les articulations de vťrins dans l'arceau et maintenir avec une vis M4
cirťe. ATTENTION position : voir ci dessus. Il y a une piŤce droite et une piŤce gauche
(position des taraudages), et un avant, un arriŤre (biseau vers l'avant). Le cŰtť
taraudť va ŗ l'opposť de la plaque taraudťe collťe sur la charniŤre !
Locate the gas lifter articulation position, drill the frame D4.
Glue the parts in the frame with epoxy and hold with a M4 screw, waxed. ATTENTION
positionning : see above : there is a right and a left part (threads), and an orientation
front/rear (corner pointing to the front). The threaded part goes on the opposed side with
the aluminium plate on the hinge.
Collez les charniŤres dans l'arceau et maintenir avec un bitard.
Glue the hinges in the frame and hold with a Cleco
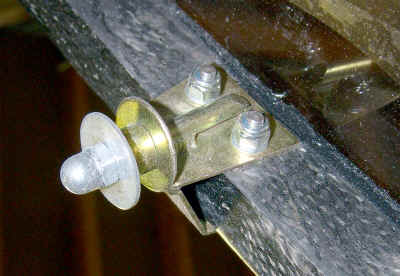
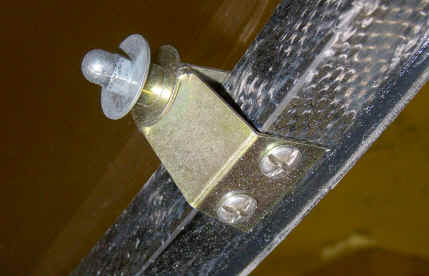
SystŤme de fermeture :
Canopy locking system
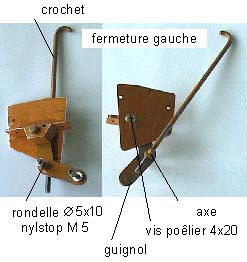
Assembler les systŤmes de fermeture (attention montage droit et montage gauche) :
Mount the locking systems (there are one right and one left assembly)
- Fixer l'axe de crochet sur le guignol. (rondelle D5*10 et nylstop M5)
- Fix the hook shaft to the lever . (washer 5*10, nylock)
- Monter le guignol sur le support fermeture verriŤre.
- Mount the lever to the bracket.
- Maintenir en position avec la plaque et une vis poÍlier 4x20 (attention au sens).
- Hold in place with the plate and one 20 mm long 4 mm diameter mushroom head
screw.
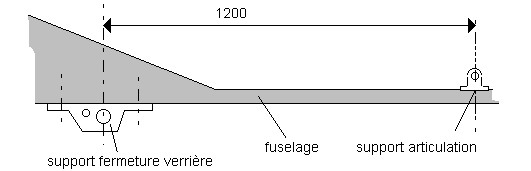
- Repťrer la position des supports fermeture verriŤre : 1200 mm de l'axe, et la
plaque en butťe contre le bord du fuselage. Contre percer D4.
- Find out the support position : 1200 mm from the axis, and the aluminium plate
against the fuselage side. Drill 4 mm diameter holes for the screws.
- Contre percer le flanc du fuselage D8, pour pouvoir ouvrir la verriŤre de
l'extťrieur.
- Backdrill the fuselage side throug the aluminium bracket, to allow to actuate the
lever shaft from the outside.
- Fixer le support fermeture verriŤre sur le fuselage. (vis CHC 4x30, rondelle D4x8,
nylstop M4)
- Fix the bracket to the fuselage : screw (30 mm long 4 mm diameter CHC screws,
4 lmm diameter washers and Nylstop nuts).
- Fixer la plaque sur le fuselage. (vis parker 2.9x12)
- Fix the plate to the fuselage with two 12 mm long 2.9 mm diameter Parker screws.
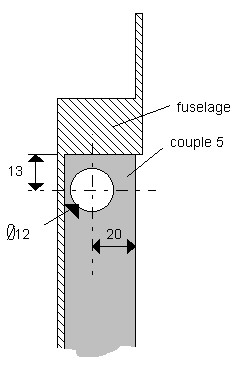
- Percer D12 le couple 5 pour le passage de la commande de verrouillage .
- Drill a 12 mm diameter hole in Nį5 frame for the canopy locking control rod.
- Passer la commande de verrouillage dans le couple 5.
- Pass the rod through the Nį5 frame.
- Fixer la commande fermeture verriŤre sur le guignol. (rondelle D4x8 et nylstop M4)
- Fix the control rod to the lever.(washer M4.8, nylock).
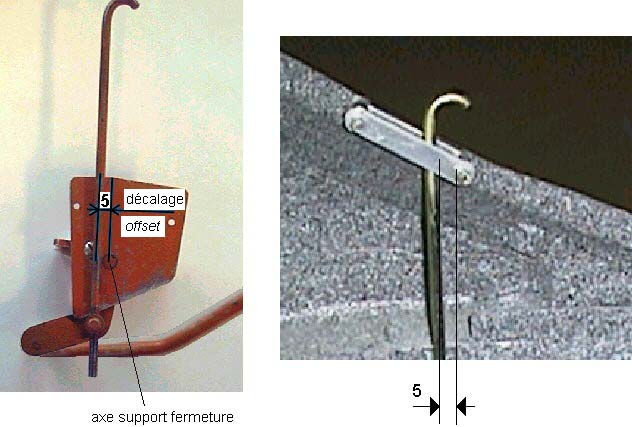
- Mettre le crochet en position verrouillťe en le plaÁant dťcalť derriŤre l'axe
support fermeture. (position impťrative : le fonctionnement du systŤme dit ŗ
"genouillŤre" impose de dťpasser le serrage maximum pour avoir un verrouillage
stable).
- Place the hook in locked position behind the shaft. (the position is critical to
ensure safe operation)
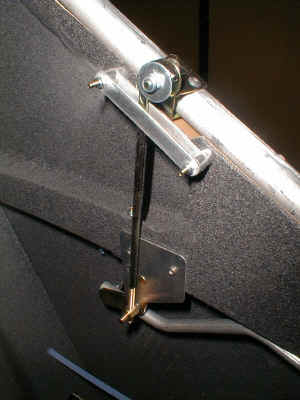
- Fixer sur le fuselage le guide crochet (laisser au moins 5 mm de jeu entre le crochet
l'entretoise).
- Fix the hook guide to the fuselage (leave a minimum of 5 mm gap between the hoock
and spacer)
- Monter l'arceau sur le fuselage
- Fix the frame to the fuselage
- Positionner la fermeture verriŤre par rappport ŗ la position
"verrouillťe" du crochet .
- Position the latch to the frame, thanks to the "locked" position of the
hook ,explained above.
- Ajustez la longueur du crochet pour avoir un lťger serrage
- Adjust the hook lenght to get a moderate tightening.
- Vťrifier la position en faisant fonctionnner le systŤme plusieurs fois.
- Check the position actuating the system several times.
- Contre percer l'arceau de verriŤre
dia. 4 mm
- Backdrill dia. 4mm holes in the frame.
- Fixer la fermeture verriŤre sur l'arceau avec des vis
poelier de 4 mm (mettre la tÍte en dessous)
- Fix the latch to the frame with 4 mm poelier screws (put the heads under).